War continues in the Firios Mountains as dwarven armies, led by King Hangvul, conquer peaceful lands. You have been sent to liberate the Valley of Aglan and ensure the safety of elven people there, Your adventure will unravel an ancient quest to summon the emerald dragons back to defend this land, as they did long ago...
Author: MrZub (Moscow, Russia), 15-07-2023 07:32 Map is not as good as you might think - Return of the Dragons Why? Because author left Boots of levitation on the map for one of the heroes, but every time said hero enters a dwarven town, he is teleported away. (Also, what happens if I pass all troops from Ingvar to Gilraen? Or Lose Ingvar before taking a dwarven town?
Author: Markus (London), 02-01-2021 20:12 Help - Return of the Dragons Discovered prison but when I step on white circle next to trebuchet game freez (hourglass appears and i cannot move). Please help
Author: Conrad Renberg (Pasco, USA), 04-08-2015 05:08 Excellent Map - Return of the Dragons Just finished this excellent map. I really enjoy maps that have lots of quest and require some planning rather than build a huge army and go out and destroy everything. I've played "The Forgotten Hero" and loved it also. THANKS AGAIN!!
Author: Patrick (Manila, Phil), 20-08-2011 18:36 Bugged with Elemental Order (alternate ending 2) first off, thank you for making a truly enjoyable map. this and forgotten hero are really 2 of the best HOMM maps i have ever played. had so much fun that i just had to play it again to see the other ending.
but im encountering a rather frustrating bug once i defeat hangvul at korvald. at the end of the battle (after hangvul vanishes and the objectives update as expected), the cursor turns into an hourglass and the game never recovers after that (you cant even complete your turn). this crash happens whether you accept godric's help or decide to fight him.
when i tried viewing the console, it says the AI is trying to rebuild the capitol at Korvald, even though he doesnt own the town anymore!
ive tried replaying the map from the start but the error still occurs. btw, im playing the map on TOE 3.1 running on win 7.
any help is very much appreciated!
thanks again and more power!
ps i also encountered another bug related to the secret cave with the gems. when i revealed it as instructed, it completely messed up the underground level making it completely unplayable (you wont be able to see anything).
Author: charlie (belgrade), 02-04-2011 16:45 bug? u can revisit genie lamp as meny times u like
i colected 5000 trents in few days is that should be possible?
Author: Standa (Prague), 15-12-2010 01:13 Cool map Hello and thank you for this wonderful map. I played it on heroic, finished in month 9, week 3. Very challenging. I would never say that the wand of Arcane crystals could be so important, I used it almost for the whole map to prevent huge stacks of shooters killing my fragile hunters. The landscape looks so natural, I must bow before your skills.
The only drawback was I couldn see the mirrors as Laurelynd writes, so I had to use the lamp. I was desparate so I looked into the walkthrough, otherwise I wouldnt find the lamp which is so well hidden.
Best Regards and I advise all RPG fans to download!
Author: Laurelynd (BC, Canada), 28-05-2010 01:08 Re: Roy's Bug This is not a 'bug' related to this map in particular, the game behaves in similar way with many other large sized maps and quite often random saves of them turn up to be corrupted. Nothing can be done about it, unless Nival patches things up, which is very unlikely.
The author of this map has implemented message at the start of the game, that the player should save frequently and under different save files, to avoid getting sent too far back in game time, as the map seems to be quite prone to this type of occurrence.
Author: Roy (USA), 27-05-2010 20:04 Bug Sorry to say I think you have a bug. Yesterday I tried to load all my autosaves and one manual saves when the hero has taken Shalaya. Today was the same so I had to a save earlier on.This loaded ok and once again went on to take Shalaya again. I had to go out so I shut tje game down. Once again I cannot load any recent saves it just crashes. This is where I have to start heroes every time. So I am having once again to start an earlier save to get back in the game.
Author: v (Seoul, South Korea), 21-05-2010 17:36 Wonderful With your map "forgotten hero", this maps are really good. I can't wait another one...
Author: tiss (Moscow, Russia), 14-05-2010 11:00 Great map Thanks for the very interesting map!
Author: Laurelynd (BC, Canada), 09-05-2010 07:32 Thanks for the help! Sorry about the late response, your advise hit the spot and I managed to successfully finish the map, without restarting. The script was working just fine, I guess it was some glitch in my game, that rendered the objects to become invisible. Go figure - I had just reinstalled the game before I started the map, one would think it would behave properly, at least for a while. Way to go, Nival!
Once again - thanks for the enjoyable map, mweil86!
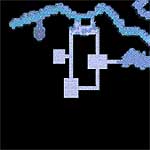
Author: mweil86, 29-04-2010 06:00 Help with the Mirror Room It sounds like a glitch on your computer's set up since the object remains even though it is not visible. If you have the console enabled you can use it to see if an error is generated causing the script to fail. If the script is working properly but the objects are just invisible I can guide you through the room. I'll label the mirrors 1-7 from left to right, top to bottom:
1 2 then
3 4 5 then
6 7 .
Approach the altar from the left side and initiate the light beam (the hero's position is important because the beam makes an impassable barrier). Switch mirror 3. Move south of mirror 4, then switch mirror 4. Switch mirror 2. Move south of mirror 5, then switch mirror 5. Go to the portal which should now be activated.
If this doesn't work, I think there's a cheat where you can generate an artifact for a hero. Then you don't have to restart the map. The Genie Lamp is the only other way to get the artifact.
Author: Laurelynd (BC, Canada), 28-04-2010 19:56 Brief review & a call for help This is an amazing and beautiful map, with great story, intricate landscape design and lots of clever surprises and side quests . It's very well balanced and although there's tons of scripts implemented, everything ticks like a clockwork. Or nearly everything.
It might as well be a problem with my setup of the game only, since the single issue I have (unfortunately - a major one), is that I cannot reach the Temple of Illuminus. The beam of light doesn't appear, after the altar is activated and although I can rotate the disks, after I touch either one of them, it disappears. The object is still there - I can see the description of it, when I point the cursor at the right spot, but the mirror is invisible and hence - can't figure which way it's facing.
Unfortunately, I've already used the Genie Lamp, to get much needed cash early in the game and the thieves don't offer to steal the Dragon Scale Armor. Looks like I'll have to restart the game for a third time, if I want to finish it and save the Lamp wish to get the Armor, if the same bug occurs again. Unless someone is able to offer cheat - how many times to touch each mirror and in what order, to activate the portal, although I doubt this will work, since the beam of light isn't there at all.
Another minor bug I noticed - for some reason, I got the Gem Monopoly quest reward long before I captured all the mines.
All in all - it's still one of the best quest orientated maps you'll ever play, I give it 10/10, as I strongly suspect the aforementioned bug is a glitch in my game setup, rather than some fault with the script.
Author: mugur, 26-04-2010 20:18 patch Unfortunately, you are right... I have 3.0 version of the game. So I guess this must be the problem. Back to the drawing board... :D Thanks anyway.
Author: mweil86, 25-04-2010 07:34 Patch Make sure you have patch 3.1 to avoid crashes in the map.
Author: mugur, 23-04-2010 18:14 problem @Edzinsh
I agree, there is a problem with the script at that point - catapult. I tried every combination (try the catapult, go to sub entrance, go to palisade wall) and in all cases the game freezes. Maybe the mapmaker will clarify the things?...
@mweil86
I'm not getting any message about the wooden wall... Go west where? To the sub entrance?...
Author: mweil86, 23-04-2010 05:12 Re Problem Are you getting a message at the catapult that says you can't use it yet? You need to travel west following the path until you get a message about seeing the wooden wall. Then when you go back to the catapult you should be able to use it.
Author: Edzinsh, 22-04-2010 13:09 Problem Great map, but i have a problem at the beginning, i cant use the catapult, so i cant go further
Return of the Dragons walkthrough
-------------------
WALKTHROUGH - Heroes 5 - Return of the Dragons
-------------------
CONTENTS
-------------------
I. Journey to Shalaya
II. The Power of Dragons (Gilraen's Quest)
III. The Dwarven Rebellion (Ingvar's Quest)
IV. The Elemental Order (Alternate Ending 1)
V. The Search for the Grail (Alternate Ending 2)
VI. Optional Quests
-------------------
I. Journey to Shalaya
-------------------
Part 1
1. Follow the path west towards Thornham. Make sure to learn Eldrich Arrow from the spell shrine near the road.
2. Thornham will be destroyed and a green hero will begin chasing you. Defeat the wyverns and cross the bridge north towards Millfield.
3. Enter the sanctuary and stay there until you receive a message saying that it is safe to leave.
4. Head north then veer west into the forest where you will find some archers and squires that will join you.
5. Return to the road and defeat the stack of skeletons. Now you can choose to travel north along the river (Part 2) or west into Blackfang Marsh (Part 3).
Part 2
1. A group of gremlims will join you. Continue north until you reach a hill fort. Upgrade the gremlins into saboteurs.
2. Return to the village you passed through and defeat the golems using the saboteur skill, Collect the wand of arcane crystal.
3. Head north again and attack the liches using arcane crystal cast next to them to prevent them from shooting.
4. Continue to the dwarven tunnel (Part 4).
Part 3
1. Find five pairs of the Cloak of Sylanna from the abandoned wagon and sell them at the trading post for 10,000 gold.
2. Collect the wand of word of light and use it to defeat the army of ghosts and skeletons guarding the boat. Visit the boat to see that it needs repairs.
3. Go to the dock house then return to the boat. Pay the 10,000 gold to have the boat fixed.
4. Sail north up the river and continue to the dwarven tunnel (Part 4).
Part 4
1. You will discover that you cannot enter the dwarven tunnel yet. Travel east and discover a prison on the other side of a wooden wall.
2. Find the trebuchet, rotate it to point it at the wall, and launch it.
3. Enter the fort and free the dwarf Ingvar from the prison. Continue his quest in Section III.
4. Go back to the tunnel and pass through it into the Valley of Aglan where some elven creatures will join you.
5. Follow the path and conquer the town of Shalaya. Continue Gilraen's quest in Section II.
II. The Power of Dragons (Gilraen's Quest)
-------------------
Part 1
1. Use the portals to reach the town of Anwaar in the desert to the southwest. Visit the library there to learn about the seven artifacts you must find. Guides to finding these artifacts are found in Parts 2 through 10 including alternative methods.
2. If you visit the academy town in Anwaar, you will have the option to agree to a proposal by the emperor of the city. This decision determines which alternate map ending you will receive. See Section IV if you choose to agree to the emperor's agreement or Section V if you reject it.
3. Use the monoliths to begin exploring the various regions of the map in order to collect the Powers of Dragons.
4. You may also explore the Valley of Aglan for extra bonuses including resources, artifacts, and creatures. All Sylvan creatures in the Valley of Aglan will join you and east of Shalaya you will find an area where you can purchase artifacts, spell, and creatures.
Part 2 (Dragon Scale Shield)
1. At the library in Anwaar you will discovered a map describing how to reach the Sunken Temple. The instructions will be recorded in the objections screen.
2. Locate one on the multiple docks, purchase a boat, and sail to the mouth of the Ythil River in the northen part of the ocean.
3. Sail in front of the statue on the east bank and you will receive a message. Continue following the directions and receive a message at each stop.
4. Finally, when you sail north from the lighthouse, to near the place where you began, the Sunken Temple will emerge.
Part 3 (Dragon Eye Ring)
1. Visit the orc stronghold in the Plains of Nagorad.
2. You can pay 20,000 gold for the artifact or fight the army of slayers, chieftans, and goblins.
Part 4 (Dragon Wing Mantle)
1. Go to the northeast corner of Blackfang Marsh to find the Naga Temple.
2. One way to reach the temple is to defeat the necromancer hero blocking the path.
3. You can also cross the water using the Boots of Levitation (found at the cyclops stockpile in the Plains of Nagorad) or the summon boat spell (found on an island in Silversand Lagoon only accessible by boat).
Part 5 (Dragon Bone Greaves)
1. Find the Great Pyramid in the northwestern Johara Desert and first Visit the sphinx.
2. You can find the answers to the sphinxes question from exploring the map or at the library. The answers to the questions are Gems, Tolgar, 5, Blackfang Toad, Mount Azul.
3. After answering the question you will be able to access the pyramid.
Part 6 (Dragon Scale Armor)
1. To reach the Temple of Illuminus, go underground using one of the two entrances in the Firios Mountains or the entrance in Blackfang Marsh.
2. Locate the altar where you will discover that you need to retrieve demon blood. There are several stacks of demons monsters throughout the map. You can find them in the Johara Desert, Blackfang Marsh, and the volcano in Silversand Lagoon.
3. Return to the altar and complete the puzzle by making the beam of light shine into the portal to activate it. The seven disks can be rotated to reflect the beam.
4. Go through the portal into the Temple of Illuminus and use your scroll of town portal to escape.
Part 7 (Dragon Flame Tongue)
1. Make your way around Silversand Lagoon until you find a path leading to the volcano.
2. Enter the tunnel in the side of the volcano and defeat the magma dragons to get the artifact.
Part 8 (Dragon Teeth Necklace)
1. The Cloud Castle is located at the top of Mount Azul in the northwest corner of the map.
2. Acquire the fireball spell from Silversand Lagoon (you can learn it from the spell shrine or one of the seer huts) and use it to melt the ice barrier.
3. At the Cloud Castle, the titan will give you the artifact unless you have killed rakshasas somewhere on the map. If you have, you will be forced to fight the titan for the artifact.
Part 9 (Thieves' Hideout - Alternate Method 1)
1. In the northern of Murkwood Forest, you will find the thieves' hideout.
2. They ask you to defeat the knight Laszlo who can be found just west of the hideout.
3. If you complete this quest, the thieves will steal one of five Power of Dragons artifacts of your choice.
Part 10 (Genie Lamp - Alternate Method 2)
1. East of Anwaar you will find a genie lamp in the desert. The genie will grant you a wish and you have the option to receive one of the Power of Dragons artifacts.
2. To reach the lamp you can defeat the stack of mummies and liches or cross the lake just south of Anwaar using the Boots of Levitation on summon boat.
Part 11
1. Assemble the eight artifacts of the Power of Dragons.
2. See Section IV Part 1 if you agreed to the proposal at the town of Anwaar. See Section V Part 1 if you disagreed to the proposal or did not visit the town of Anwaar.
III. The Dwarven Rebellion (Ingvar's Quest)
-------------------
1. Conquer the nearby town and begin building an army. Collect resources and get the military post nearby.
2. When you are strong enough, expand westward. You will find several military posts and many gem mines. Taking these mines will hamper the green team's creature production.
3. After you have taken three green towns, you will be able to attack the final town, Kolvard. How you attack this town will be determined by the decision you made at the town of Anwaar which determines the map ending.
4. See Section IV Part 2 if you agreed to the proposal at the town of Anwaar. See Section V Part 2 if you disagreed to the proposal or did not visit the town of Anwaar.
IV. The Search for the Grail (Alternate Ending 1)
-------------------
Part 1 - Gilraen's Tasks
1. Return to the town of Anwaar and get the blue gate key.
2. Go to the northern part of the Johara Desert and cross the bridge. Learn some spells at the golem factory and get the Grail map at the palace.
3. Return to the Valley of Aglan and head to the lakebed just north of Shalaya. Ingvar must destroyed the dam (as explained in Part 2) in order for the lake to fill with water.
4. Take the boat across the lake to the island, defeat the monsters that appear, and dig up the Grail.
5. Return to Anwaar and defeat the blue knight Godric that has taken the town.
Part 2 - Ingvar's Tasks
1. Build up a strong army and attack the town of Kolvard.
2. Take the path near Kolvard south towards the Johara Desert. You will find a golem factory where you will learn some important spells including implosion. Multiple heroes can learn these spells.
3. In order for Gilraen to finish his quest, you will need to bring a hero that has learned implosion (at the golem factory) to the site of the dam. The hero will cast the implosion spell and destroy the dam causing the lake to fill with water.
4. Defend your towns from the four knights that invade your territory from the west, north, and east.
V. The Elemental Order (Alternate Ending 2)
-------------------
Part 1 - Gilraen's Tasks
1. Go to the town of Anwaar and get the blue gate key.
2. Travel to the northern part of the Johara Desert and cross the bridge. Collect the nearby Bearhide Wraps. Kill the wizard (he has has strong ice magic) guarding the golem factory.
3. With the help of Ingvar (see below), visit all three golem factories surrounding the palace. Only then will the magic barrier dissipate.
4. Defeat Razzak (he has has strong earth magic).
Part 2 - Ingvar's Tasks
1. Build up a strong army and meet the knight Godric outside the town of Kolvard.
2. If you agree to Godric's battle plan, he will defeat the garrison outside Kolvard. If you disagree, you must defeat Godric but the garrison creatures will join you.
3. Conquer Kolvard then follow Hangvul south towards the desert.
4. Kill the two wizards you find there. One has strong fire magic and the other has strong lightning magic. Remember that some dwarven creatures have immunities to these elements.
5. Visit the two golem factories the wizards are guarding to help Gilraen destroy the magic barrier surrounding the Palace of the Elemental Order.
6. Defend your towns from the four hero that invade your territory from the west, north, and east. If you attacked Godric earlier then these heroes will be knights. If not, they will be barbarians.
VI. Optional Quests
-------------------
Part 1 - Gilraen's Tasks
1. The Swan Egg - At one of the huts in Silversand Lagoon, you will be asked for the egg of a scarlet swan. You will find it a the nest near the scarlet swan in Blackfang Marsh. The reward is plus 5 spell power and knowledge.
2. The Lion's Spirit - At one of the huts in Silversand Lagoon, you will be asked for the artifacts of the Lion's Spirit Set. You will find one piece in the eastern part of the Plains of Nagorad, one piece in the southeastern corner of the Johara Desert, and one piece underground in the dwarven tunnels. The reward is the Archer's Dream artifact set.
3. The Cyclops Stockpile - You will need at least five treants to open the cyclops stockpile in the western part of the Plains of Nagorad. Inside you will find some gold and the Boots of Levitation. The Boots of Levitation will help you cross areas in Blackfang Marsh, the underground caverns, and the Johara Desert.
4. Rakshasa Pelts - After visiting the Hunters' Guild (in the mountains near the middle of the map), attack groups of rakshasas in the Johara Desert. When you return to the Hunters' guild you will receive 200 gold for each rakshasa you killed. However, killing rakshasas will cause the titan in the cloud castle on Mount Azul to attack you will you go there for the Dragon Teeth Necklace.
5. Vayshan's Bounty - The hero Vayshan can be found in the underground caverns guarding some gold and the Armor of the Forgotten Hero. After defeating him, go to the Hunters' Guild (in the mountains near the middle of the map) for a 20,000 gold reward.
6. Genie Lamp - East of Anwaar you will find a genie lamp in the desert. The genie will grant you a wish and you have the option to receive one of the Power of Dragons artifacts, a strong temporary battle boost, 50 treants, or 50000 gold. To reach the lamp you can defeat the stack of mummies and liches or cross the lake just south of Anwaar using the Boots of Levitation on summon boat.
7. Thieves' Hideout - In the northern of Murkwood Forest, you will find the thieves' hideout. They ask you to defeat the knight Laszlo who can be found just west of the hideout. You may return to Laszlo and tell him where the hideout is for a 5000 gold reward. If you help the thieves by defeating Laszlo, they will steal one of five Power of Dragons artifacts of your choice. If you already have those five artifacts they will steal a random relic for you. If you help Laszlo, a group of cavaliers will be added to the garrison of Shalaya in two weeks.
8. The Ice Wall - A wall of ice will prevent you from scaling Mount Azul in the northwestern corner of the map. Acquire the fireball spell from Silversand Lagoon (you can learn it from the spell shrine or one of the seer huts) and use it to melt the barrier.
Part 2 - Ingvar's Tasks
1. The School of Magic - At the garrison north of Freywar, the magi ask you to retrieve the Ring of Sar-Issus. You can find it after fighting a group of dark elves at the blood temple in Murkwood Forest. After returning to the garrision, a group of magi will join you and you will be able to enter the area. Furthermore, you will be able to enter two other similar locations on the map (where you can increase your stats and collect spells) without fighting garrisons of magi.
2. The Blood Temple - At the blood temple, the dark elves ask you to kill the magi at the school of magic. Doing so will allow you to enter the area but you will face strong garrisons of magi at two other similar locations on the map. The dark elves will reward you will 100 minotaurs.
3. The Sculptor - Bring 50 ore to the hut near Kolvard the scultor will build a sculpture. Visiting the sculpture will raise all of your temporary battle bonuses by 2 each week.
4. Gem Monopoly - Capture the 15 gem mines on the map to get a bonus of 500 defenders at Freywar. Ingvar can access 13 of the mines above ground. The other 3 are below ground and only Gillion can access them.
Part 3 - Secret Areas
1. Rotate the trebuchet counterclockwise as far as you can and launch it. It will open a cave filled with gems.
2. Cross the river just east of Millfield to find some treasure chests.
3. In the Valley of Aglan near the sawmills you will find a pile of gems hidden in the trees. After you pick them up, you will be able to walk on a hidden path in the trees to a clearing where a group of unicorns will join you.
4. Get on a boat and sail to the coast near the Palace of the Elemental Order. You will see a place to land and a path that leads into the mountains near Kolvard. There you will find the Ring of Speed.
5. There is an island northeast of Silversand Lagoon. At the dwelling on the island you can increase your stats and learn some skills.
6. Summon a boat at the underground river and sail west. When the path dead ends, fight the stack of demon and approach the devil. He will increase either your attack adn defense or spell power and knowledge by 20 each. However, on the first day of each week you will receive a negative temporary battle bonus.

 Likes
Likes